
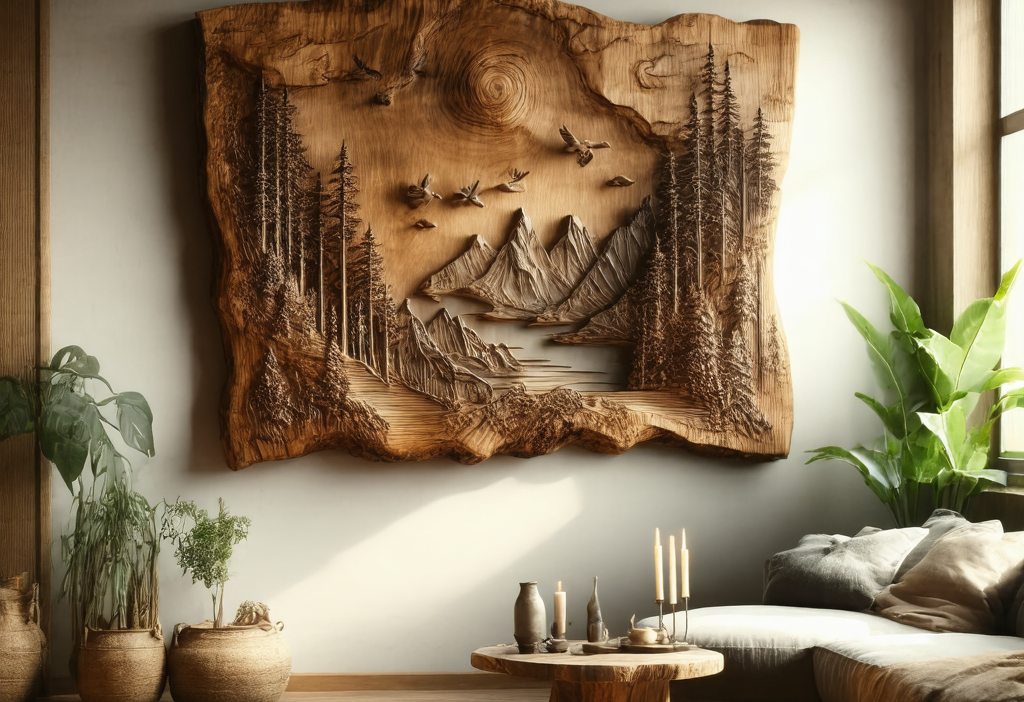
Create a Rustic Wooden Wall Art Masterpiece: A DIY Guide
Welcome to our step-by-step guide on creating your very own rustic wooden wall art. Whether you’re a seasoned woodworker or just picking up tools for the first time, this project is perfect for anyone looking to add a touch of nature’s charm to their home decor. Let’s dive into how you can turn simple materials into a stunning piece of functional art.
Why Rustic Wooden Wall Art?
Rustic wooden wall art isn’t just another decoration; it’s a statement. It brings the essence of nature indoors, creating a calming and earthy ambiance that instantly elevates any room. Plus, with DIY projects, you have complete control over the design, size, and style. Here are some reasons why this project is worth your time:
- Adds warmth and character to modern spaces
- Perfect for all skill levels
- Cost-effective compared to store-bought options
- A sustainable way to repurpose old wood
Materials You’ll Need
Before you start, gather these essential materials:
- Wood planks: Reclaimed wood or new lumber works well. Consider visiting local hardware stores like Home Depot for great deals.
- Sanding paper: Varying grits from coarse to fine for a smooth finish.
- Wood stain or paint: Choose colors that reflect your personal style and the room’s decor. Check out eco-friendly options at Lowes.
- Nails or screws: For assembling the frame.
- Hanging hardware: Picture hooks or sawtooth hangers for easy installation.
- Optional: Decorative elements: Think about adding metal accents, rope, or even a small LED light strip for extra flair. Etsy has some amazing finds like this rustic charm set.
Step-by-Step Guide to Creating Your Rustic Wooden Wall Art
1. Planning and Designing Your Piece
Start by sketching your design on paper. Think about the overall shape—square, rectangular, or even a custom cutout for a unique look. Consider incorporating elements like tree stumps, leaves, or geometric patterns. Don’t be afraid to mix traditional and modern aesthetics for an eclectic feel.
“The best designs often start with a simple sketch. Let your creativity flow without overcomplicating things.”
2. Cutting the Wood
Using your design as a guide, cut the wood planks to size. If you’re working with reclaimed wood, sand any rough edges and remove old nails or staples. For a cleaner look, consider using a router to create smooth borders around each piece.
3. Assembly
Once all pieces are cut and sanded, assemble them into your desired shape. Use nails or screws to secure the planks together. If you’re creating a frame, ensure it’s sturdy enough to hold its shape once hung on the wall.
4. Finishing Touches
Sand the entire piece one last time to remove any splinters or rough spots. Wipe away dust with a damp cloth and let dry completely before applying stain or paint. For a weathered look, try using Oberon‘s distressing tools to add intentional imperfections.
5. Adding Decorative Elements
This is where you can really make your piece unique! Attach metal accents, add a rope border for texture, or incorporate LED lights for a glowing effect. If you’re going the lighting route, ensure all connections are secure and consider using Amazon‘s smart plugs for easy control.
6. Hanging Your Masterpiece
Install hanging hardware on the back of your piece and hang it in your chosen spot. Step back and admire your work—congratulations, you’ve just created a one-of-a-kind rustic wooden wall art!
Tips for Success
- Work in a well-ventilated area when staining or painting.
- If using reclaimed wood, check for any signs of decay or insects before starting your project.
- Consider the weight of your piece and use appropriate hardware to prevent damage to walls.
Frequently Asked Questions
Q: Can I use different types of wood for this project?
Absolutely! Mix and match different woods for a varied texture and color palette. Just ensure all pieces are properly sealed to prevent warping or splitting.
Q: How do I maintain my rustic wooden wall art over time?
- Dust regularly with a soft cloth.
- Avoid placing near direct heat sources like radiators or fireplaces.
- If needed, touch up any scuffs or scratches with a small paintbrush and matching stain.
DIY projects are all about personalization, and this rustic wooden wall art is no exception. Whether you’re creating it as a gift or for yourself, the end result will be a beautiful conversation starter that brings nature’s beauty into your home. Happy crafting!