
DIY Terrariums: A Step-by-Step Guide to Crafting Your Own Miniature Ecosystem
Have you ever wanted to bring a piece of nature indoors? DIY terrariums are the perfect way to do just that. These miniature gardens aren’t just beautiful; they’re also low-maintenance and full of personality. In this guide, we’ll walk you through everything you need to know to create your own terrarium masterpiece.
What is a Terrarium?
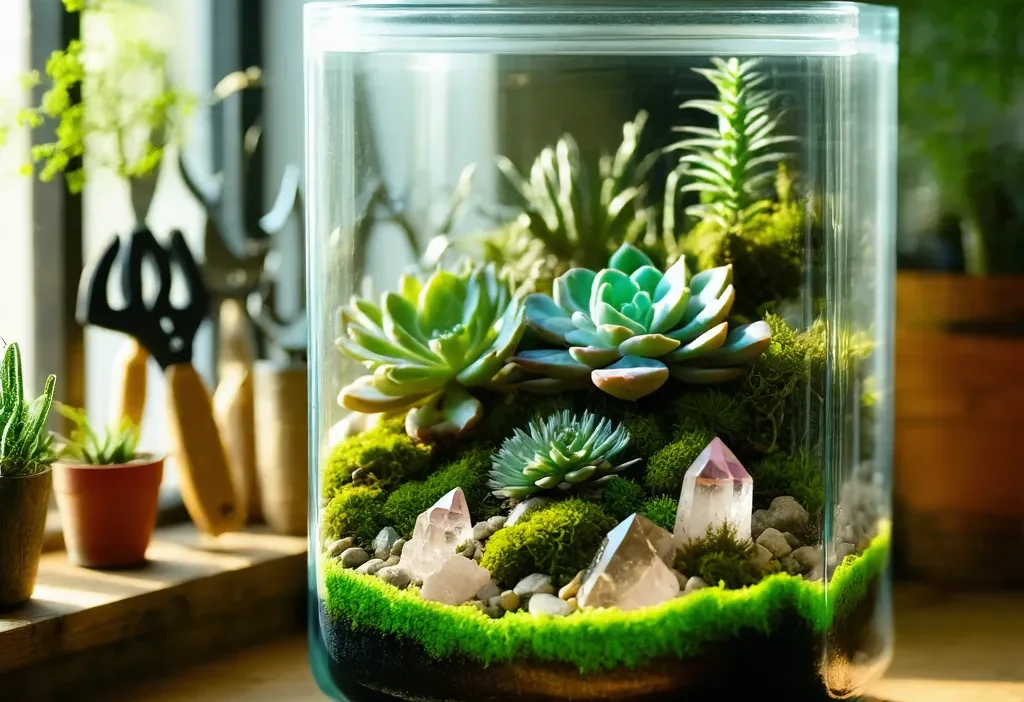
A terrarium is like a tiny ecosystem in a container. It’s typically made with plants, soil, and decorative elements all enclosed within a glass or transparent container. The best part? They can be as simple or as elaborate as you want them to be. Whether you’re aiming for a minimalist look or a tropical paradise, the possibilities are endless.
Choosing the Right Container
The first step in creating your terrarium is selecting the right container. You can use anything from a glass jar to a fish tank, but clear containers are best because they allow light to filter through and showcase your creation beautifully. Here are some tips:
- Size matters: Pick a container that fits your space and the plants you want to include.
- Shape matters too: Consider whether you prefer something tall and narrow or short and wide.
- Closure type: Open containers are great for succulents, while closed ones work well for humidity-loving plants like ferns.
Selecting the Right Plants
Not all plants thrive in terrariums. Here’s how to choose:
- Succulents and cacti: Perfect for open containers as they prefer dry conditions.
- Ferns and mosses: Ideal for closed containers because they love humidity.
- Miniature plants: Look for varieties like pussy willows or dwarf palms that stay small.
Building the Layers
A well-structured terrarium has multiple layers, each serving a specific purpose. Follow these steps:
- Drainage Layer
- Start with gravel or small pebbles to ensure proper drainage and prevent root rot.
- Activated Charcoal
- Add a layer of activated charcoal to keep the soil fresh and prevent mold growth.
- S Soil Layer
- Potting soil goes next. Use a mix designed for your specific plants.
- Planting Layer
- Gently place your plants in the soil, leaving enough space for them to grow.
- Decorative Layer
- Add a final layer of decorative elements like sand, stones, or beads to give your terrarium personality.
Tips for Designing Your Terrarium
Creating a visually appealing terrarium is all about balance and creativity. Here are some tips:
- Color contrast: Mix plants with different leaf colors and textures.
- Height variation: Include both tall and short plants to add depth.
- Add interest: Incorporate small figurines, driftwood, or decorative rocks for a unique touch.
Maintenance Made Easy
Once your terrarium is set up, it requires minimal care. Here’s what to do:
- Watering: Closed terrariums need water only once every few weeks. Open ones may require more frequent watering depending on the plants.
- Lighting: Place your terrarium near a window where it can get indirect sunlight. Avoid direct sun to prevent overheating.
- Cleaning: Wipe the inside of the container occasionally with a soft cloth to maintain clarity and promote healthy plant growth.
Getting Creative
Don’t be afraid to experiment! Here are some creative ideas for your terrarium:
- Dry gardens: Use air plants and cacti in an open container for a desert-themed display.
- Bonsai trees: Create a miniature forest with dwarf trees and moss.
- Underwater scenes: Add small figurines like frogs or turtles to mimic a pond environment.
Conclusion
DIY terrariums are more than just decorative items—they’re a way to connect with nature and express your creativity. Whether you’re a seasoned gardener or someone new to the craft, creating a terrarium is a fun and rewarding project that will bring life and beauty into your home. So why not give it a try? With a little bit of planning and some careful attention, you’ll have a stunning miniature garden that’s sure to impress.